The “How To” Guide for Laboratory Lattice.
How to Install a Side & Bottom Lab-Frame
Types of screws used in lattice installation.
The material of the benchtop in this video is either molded epoxy or Silica Sand and Epoxy Resin. In our fume hood, we used #10-32, stainless steel machine screws. 10 is the diameter size of the screw and 32 is threads per inch. This was the best option of fasteners for our fume hood because of the limited options for a benchtop of this material.
A threading tap is a hardened tool that will cut threads into almost any material. We suggest diamond core bits to drill into the 1″ to 1.25″ thick surface. You may also wear a dust mask and protective glasses when drilling holes in your benchtop for added safety. If you have a wood benchtop or a metal benchtop, a sheet metal screw or wood screw would need to cut its own threads into the material. We suggest a #10 screw.
For the sides of the fume hood we used a standard Phillips, #10 screw, ¾” long.
Warning: If you are working with an older fume hood, you must be careful of asbestos. Asbestos was used inside of older fume hoods. Inhaling asbestos fibers can be deadly.
Placement of lattice in a Fume hood.
The placement of the lattice is completely up to the user. Lab-frames may be needed for a specific area in your fume hood or covering your entire back panel for maximum holding capacity. Lee Engineering’s Back Mount Lab-frame is designed to be used when you need you don’t want lattice attached to the sides or bottom of your fume hood and/or need a lab-frame in a specific area of your fume hood.
If you need a lab-frame across the entire back panel of your fume hood, Lee Engineering’s Side and Bottom mount is recommended. With the Side and Bottom mount the Lattice grid (Lab-frame) attaches directly to the fume hood for added strength.
At Lee Engineering we can custom create a lab-frame to your specification.
Lab-frame connectors for a distillation grid
In this video, open stainless steel connectors were used. Since the connectors were open they could be placed on the lab-frame last. If the connectors are closed connectors, like the Stainless Steel Closed Connector or the Plastic closed connector, you would want to make sure that they are being slipped on the rods as the rods are being installed. For instance, if we were using closed rods in this installation, the lab-frame would be loosely put together before it would be placed in the fume hood and screwed down.
How to Measure a Fume Hood for Lattice
Lab Frames are space savers because they allow you to mount your glassware instead of using up valuable workspace in your hood. Fitting is a simple task and takes just a few measurements. As you take the measurements, you do need to consider what type of frame you are measuring for. This guide will help you measure for a Lab Frame that reaches the full width of your frame.
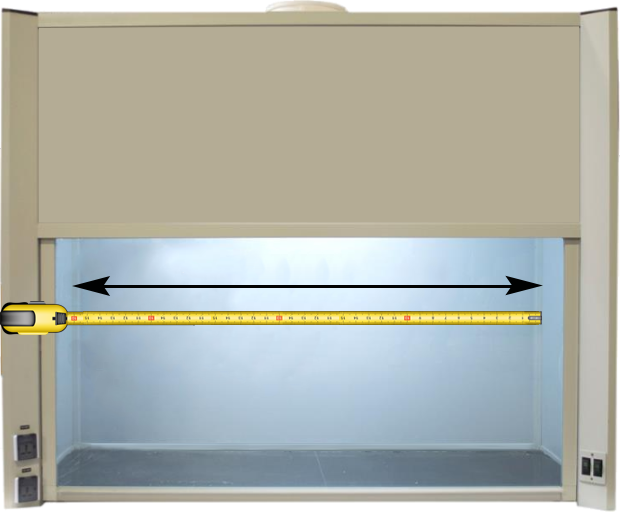
STEP: 1
Measure horizontally across the inside top of the hood, where you plan to mount the frame. Once you have that measurement subtract ¼” and that is your horizontal rod measurement.
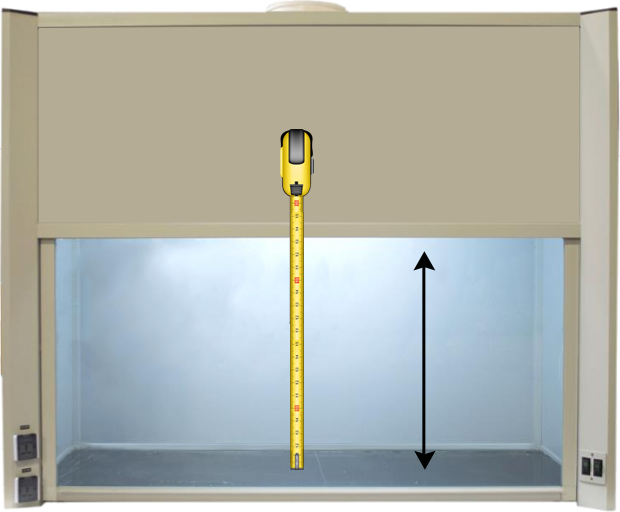
STEP: 2
Lee Engineering’s Lab Frames come standard with a 36” vertical height. This means that your lattice would measure 36” high from the bottom of your workspace. If you need a different size, try our custom lattice builder and build a custom frame to your specifications.
How to Build a Lab Bench
On this page, we’ll teach you how to make a laboratory bench. A lab bench (or benchwork) is one of the single most important parts of any laboratory. This is the space where work is prepped, experiments take place, readings are taken, and laboratory equipment is stored and used. Without lab benches, laboratories would be dysfunctional and inefficient. At Lee Engineering, we want your lab to be safe, durable, and efficient, so we’ve listed some tips on how to make your own lab bench below. Of course, you could contract someone to do the work for you, but if you’re a budget-conscious, hands-on person who takes pride in your creations, this informative section might be the perfect resource for you.
Lab Bench Materials
Here are a few important questions to take into consideration when choosing materials for your laboratory bench:
- What is the durability of the materials available – what will they stand up to?
- What are the chemical- and flame-resistant properties of the finishes?
- How easy will it be to clean the material after an experiment or test?
Space in Your Laboratory
Whether you’re planning a laboratory for your home, business, or school, spacing and sizing are important aspects to take into consideration. The first thing to assess is overall space. Ask yourself, “Do I have enough room to build a functional laboratory at this location?” Building a laboratory doesn’t have to be limited to commercial labs or educational science rooms. If you’re an at-home enthusiast, a garage, attic or spare room may do the trick. No matter where you put your lab, always ensure your laboratory has sufficient ventilation.
Lab Bench Depth
Benchtops for different applications vary in depth. The length of the benchtop is determined by your specific needs. Here is a general guideline for bench depth:
| Application | Depth in Inches (cm) |
| Casework Benchtops | 30 or 33 inches (76 or 84 cm) |
| Mobile Benchtops | 30 inches (76 cm) |
| Mobile Benchtop Islands | 36 inches (91 cm) |
| Benchtops for use Under Fume Hoods | Between 34 and 40 inches (86 to 102 cm) |
Benchtop Height
Benchtop height might seem like it’s standard, but it isn’t. The height of your bench determines two very essential aspects:
- How comfortable the scientist or student will be when working at the station
- How the height influences many other features of the workstation, such as plumbing, electrical, placement of overhead cabinetry, etc.
One thing to take into consideration is to make sure there is adequate legroom for a person sitting on a stool or chair at the bench. You’ll want your scientists (whether amateur or expert) comfortable when conducting tests, experiments, and analysis.
Step-by-step
- Measure out the space you have to build your lab bench (or benches).
- Take into consideration the bench depth for your application, aisle width, and bench height (defined above).
- Choose what kind of lab bench best suits your needs (i.e. a stationary bench or a mobile version.
- Draw up plans (with measurements) of your desired laboratory bench.
- Determine how much weight will be applied to your benchtop. This will affect the design, materials, and size.
- Research materials best suited for your application(s). Chemical and fire resistant materials and finishes are available if you will be working with hazardous materials and/or fire.
- Purchase the materials to make your lab bench (REMEMBER: measure twice). If you buy in bulk, it should help with cost. Materials to buy may include:
- Frame material (wood, metal, composite, etc.)
- Fastening hardware (screws, nuts, bolts, braces, etc.)
- Finishing material – whether you choose a sheet material, like a thin metal or a stone top, or an adhesive varnish, like a flame- and chemical-resistant finish, make sure it meets the specifications for your application.
- It’s important the finish is smooth and easy to clean.
- Caulk or adhesive to fill in cracks and crevices.
- Other hardware, like drawer and cabinet assembly materials (optional)
- Heavy-duty casters – if your lab bench is mobile
- Sink, plumbing, faucets, etc. Depending on the application, you may need to incorporate hands-free faucet operation and an eyewash station (optional)
- Ensure you have the tools to complete the construction. Tools may include:
- Tape measure (measure twice; cut once)
- Saw
- Drill (with drill bits and screw head adapters)
- Level
- Stud-finder (if your lab bench is stationary)
- Cut raw materials and assemble your lab bench.
- Remember: cracks and crevices are your enemies. When assembling pieces and you notice a joint, make sure you seal it with the proper caulk or adhesive.
- Ensure assembly is true, level, and fits your space.
- Apply finish
- Install cabinets and drawers (optional)
- If your lab bench is stationary, secure it to the wall using the stud-finder. Securing your bench to studs ensures stability. If it’s mobile, install the caster wheels.
- For mobile benches, remember to lock your caster wheels when you are conducting experiments or tests.
- You now have a completed lab bench
Aisle Width
The standard for aisle width in professional laboratories is five feet. This allows enough room for people to pass behind a person working. It also allows for minimal effort when moving equipment, samples, and other apparatus to the benchwork behind.
Lab Bench Materials
For clean rooms, polypropylene or stainless steel frames and tops may be used. When picking out materials, keep in mind how you will be using your bench. The supplies you use and the weight the bench will need to bear are important.
Safety and Efficiency in Your Laboratory
Safety in the laboratory cannot be stressed enough. Even if you’re not working with hazardous chemicals, the number one rule is always safety. Make sure you always wear your Personal Protective Equipment (PPE) and have it stored in an easily accessible place. There may be state regulations on K-12 work areas, especially regarding walkway widths, fume hood placement, and casework design.
Sinks and Washing Stations
Sinks are a great addition to any lab and are required in most professional labs. Having a sink in your lab supplies you with a convenient place to wash your equipment and yourself. In case of emergency, eyewash stations are a smart choice as well. Eyewash stations can be incorporated into your sink setup. Most laboratories, especially ones handling hazardous materials have foot, elbow, or electronic controls to turn water on and off. If you have one sink or many, an eyewash station is recommended for at least one sink. For classroom applications, the National Science Teachers Association (NTSA) recommends one sink per five students. At least one sink should be ADA-approved for use for disabled students. An additional sink with an adjacent 6- to 8-foot counter area is recommended for the instructor’s use. According to the NTSA, classroom sinks:
- Must contain hot and cold water
- Must be handicap accessible (at least one)
- Must be at least 8 inches deep
- Must have tall swiveling, aerating faucets
- Must contain a clearly marked eyewash station (at least one)
Space for Safety
The NTSA also recommends 45 square feet of space be available for each student. This ensures students can work comfortably and safely. This number can also be applied to commercial labs. Work surfaces are an important aspect of your lab bench. It may come into contact with hazardous material or flame, so it’s very important the work surface of your lab bench is chemical- and fire-resistant, smooth, and easy to clean. In addition, all benchwork should be easy to repair. To enhance the efficiency of your laboratory, task lighting is a smart addition. For flooring under and near lab benches, chemically-resistant covered flooring is a must-have. Full sheets of flooring instead of tiles are recommended, because tiles may degrade or loosen over time, making the laboratory unsafe. Rubberized materials for benchtops or flooring (with a small amount of slip-resistant grit) are a desirable and popular feature for chemical laboratories. For ventilation, the rule of thumb is one fume hood required for every two people who work with hazardous chemicals. This ensures safety for those people and leaves enough room for others to conduct experiments and tests.
Laboratory Adaptability
It’s important for a lab to have the ability to change and adapt quickly and effortlessly. This is why Lee Engineering’s lab framework is designed – to offer scientists, students, and amateur chemists equipment to adapt to their needs. Every piece of equipment we sell is made with ease of use in mind. We are also highly focused on durability and safety – two other very important things in a laboratory setting. For permanent applications and laboratory setups, our lab frames are easily attached to lab benches, walls, and flooring. For temporary setups, we offer convenient lab frame lattice stands with all of the safety and durability characteristics we guarantee with all of our products.
How much weight a Lab-Frame can hold
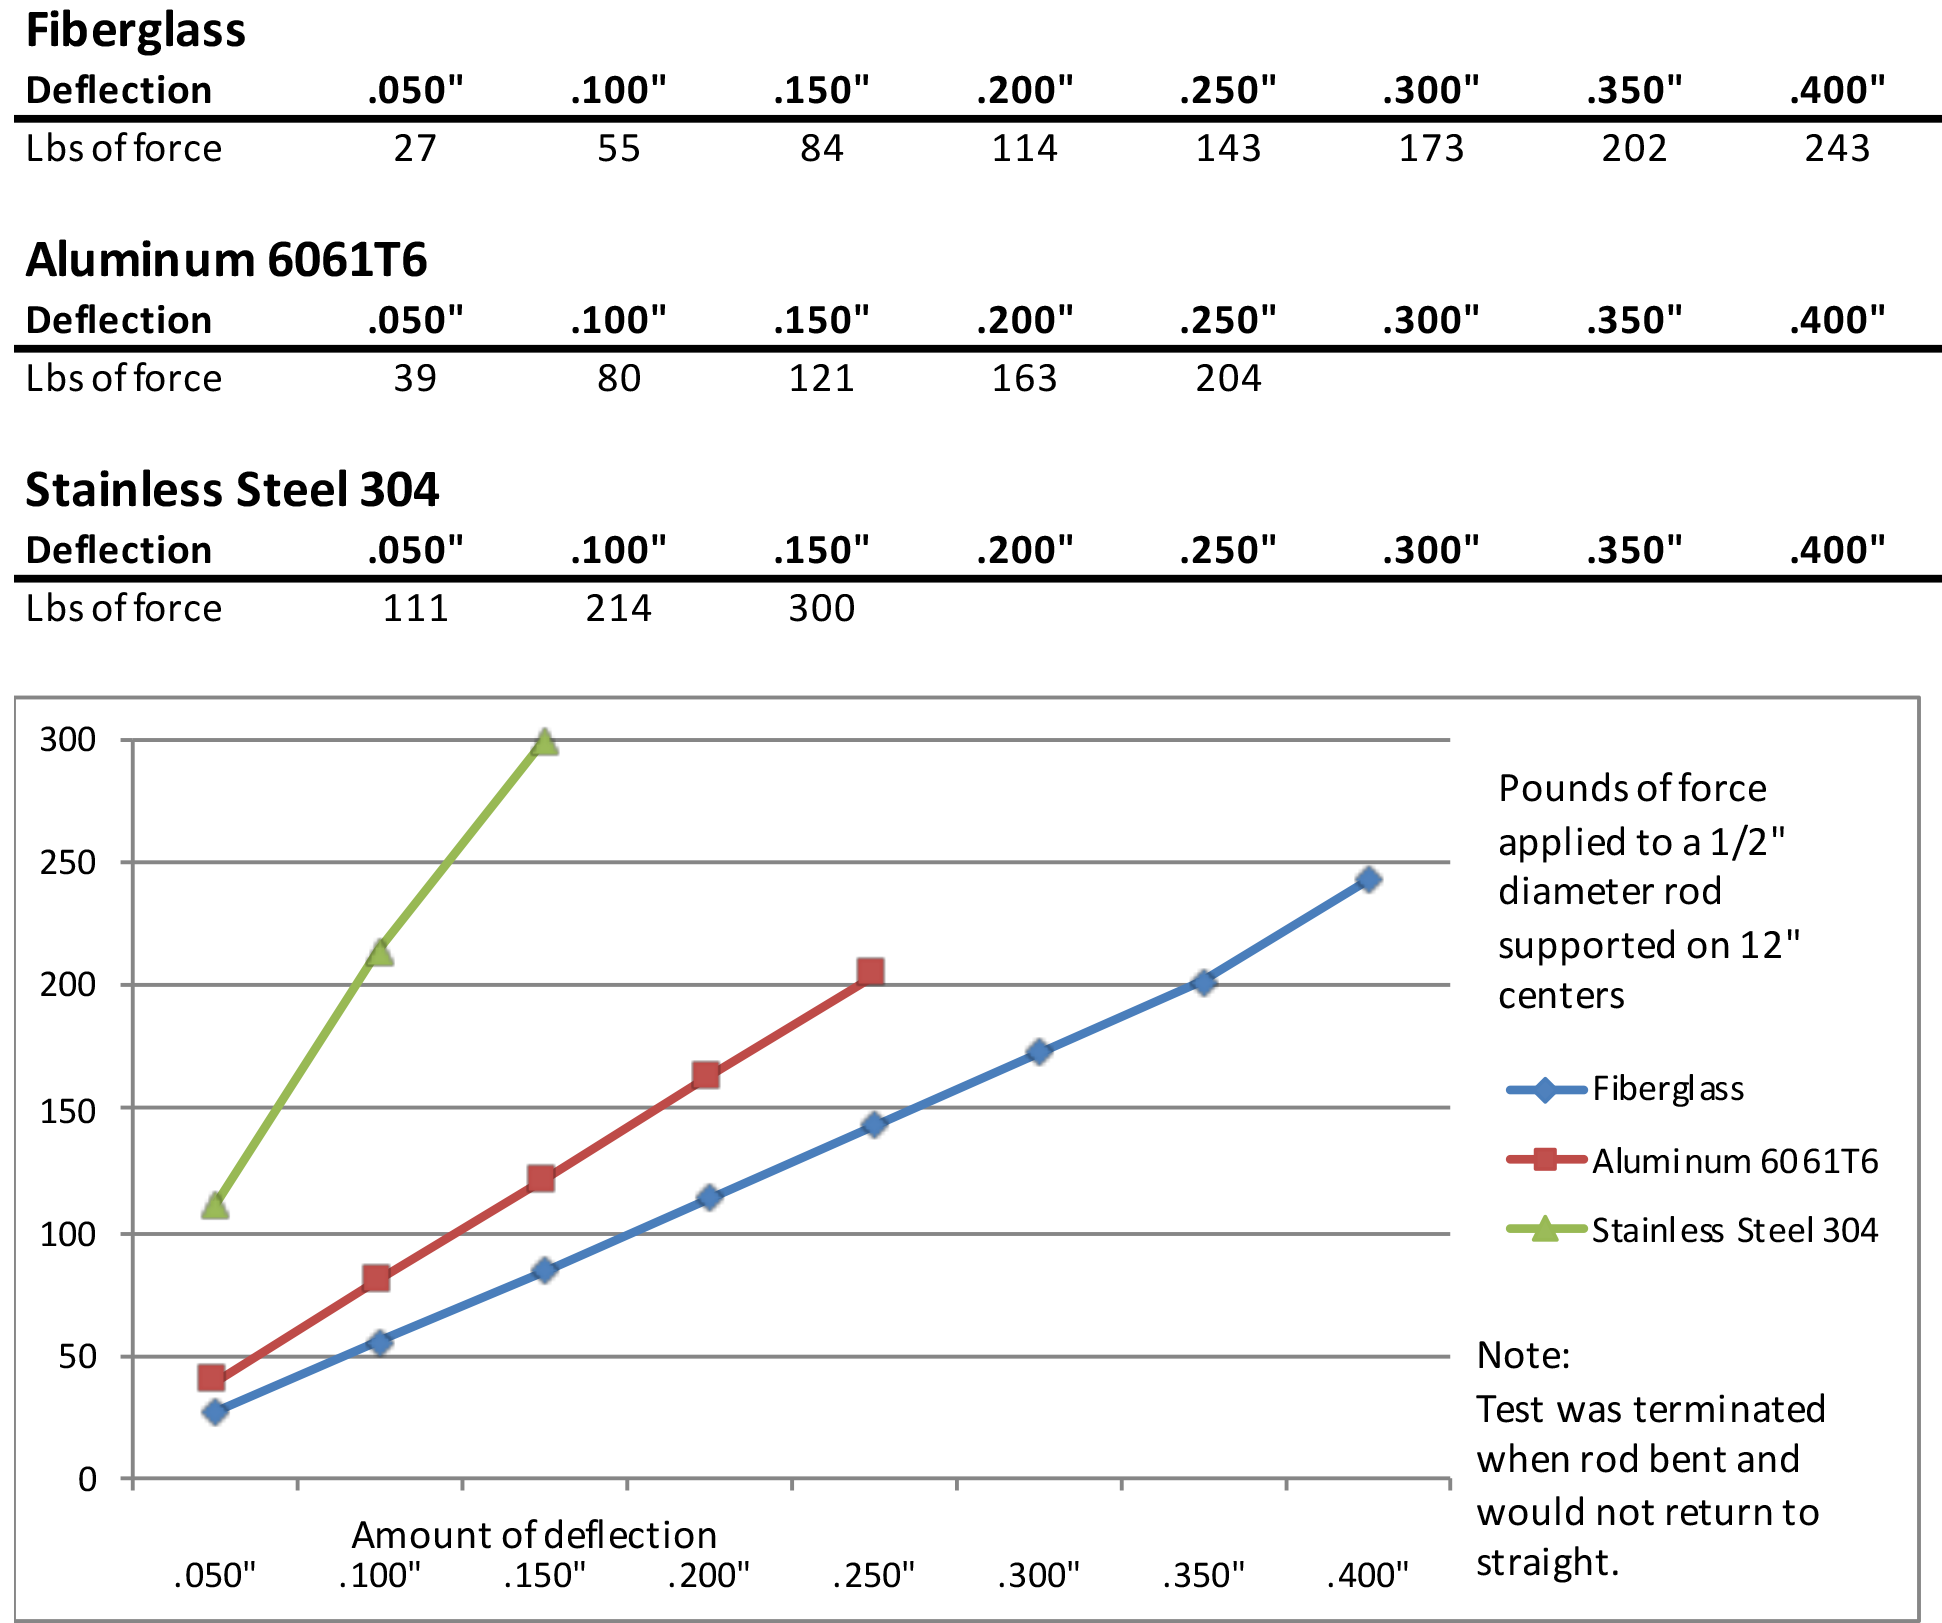
Lee Engineering understands the importance of apparatus support. Sometimes frames can take on a lot of weight due to various test sources and materials. We were curious about how each of our rods performed under different amounts of stress so we designed a test to analyze the bend point for each rod.
Using a ½” diameter rod, supported exactly 12” between centers, we measured a force applied to the center to find the amount of deflection. As you can see in the graph below, the aluminum and stainless steel rods will support a high amount of force before experiencing a permanent bend. Alternately, the fiberglass rod will bow, but has a greater tolerance to bend back after the pressure is released. Each test was concluded when it reached a point of permanent bend.
While these tests are not guarantees that each rod will perform identically, they act as a guide for customers to help them understand which rod will work best for their laboratory needs and use.
Equipment Use Guide
From advanced manufacturing labs to grade school science rooms, latticework must be safe, robust, and easily manipulated. The words, strong and mutable would seem to contradict one another, but Lee Engineering’s years of experience have helped us create amazing products with both properties.
Contact Us
Whether you need a custom or bulk lattice quote, inquiries about a custom product, or any other question, please reach out to us. The team at Lee Engineering is here to help you find the right product to complete your project or compliment your product. We can't wait to hear from you.